Saturday, December 26, 2015

Pignolata


Hey now...
It's time to face the music.  It's the holidays and with the great tradition in keeping up with our relatives of days gone by...we BAKE, and bake and bake and bake. And since you are here on my blog looking at all the yummy sweet treats that I simply can't seem to get enough of, I'm going to assume you are here looking for recipes or simple recipes at best. (If you are just here to  dream or browse, that's alright too but mind your keypad, you don't want to get it all goopy from drooling,  just saying.)
But, perhaps you are here to pass off a to do list of things to bake, to your mom, kids, friend or loved one to make for you this Holiday season or New Year. And if that's true, Great, because this is one of the easiest quickest recipes around.
When my kiddos were younger, I tried to keep our Italian family traditions alive and made delicious meals of Pasta and Italian cookies just like Great Grandma used to make. I would try and make her potatoes, eggs and anything the family talked about...I'd attempt it.
So a few years ago, I was talking to my mother and told her I had found this Pignolata recipe that I had wanted to make for Christmas.  She proceeded to tell me her mom and grandma always made this when she was younger.  Well hello momma...
Did you miss the memo  (Laughing out loud)  about me wanting recipes for our traditions?  Perhaps I jogged her mind of Holiday's past but I was super excited to take an Italian tradition, twist it a bit and make it our own holiday treasure.  So here it is.  And this Pignolata recipe is as easy and simple as you can get. Sweet and Crunchy, we've made this our Dessert and Christmas morning breakfast tradition, just like Great Grandma Randazzo did.

Pignolata Recipe:

1 Can Ready made Biscuit dough
Oil for frying
1/2 Cup Agave
1 Tbs Orange Marmalade
Pinch Cinnamon
Candy sprinkles

Add Oil to a deep pan.  Make sure the oil is about two inches deep.  Heat on high for about 2-3 minutes. Cut each biscuit into 9 small pieces if the biscuits are large, and 6 pieces if the biscuits are small.  Add about 9 pieces at a time to the hot oil stirring while they are cooking.  Once they turn golden brown, remove them with a slotted spoon and place on Paper towel to drain. Finish remaining biscuits.
In a large bowl, mix agave, cinnamon and orange marmalade with a whisk. Add the fried dough to the bowl and stir until all pieces are covered with the mixture.  Place on a dish or bowl and sprinkle with candy sprinkles.  Eat a few and then call your family in to enjoy.  Or go ahead and be nice since tis the season... and share from the get go.  (I was just trying to help you out since they do go really quickly!) 
Enjoy...


Hey Lovely...

Thank you for stopping by to see me.  I'd love it if we could meet up again. Let me know what you think about this recipe and my others by joining me here on the blog, facebook or instagram and share a little love.  Why?  Well, it's because I love you too...

So stay awhile, have a nice beverage of your choice, grab a treat or two and enjoy....

                                                   ©2015 MyDeliciousVeganDiary


Wednesday, December 23, 2015

Spumoni Truffle Cake Balls


 It's that magical time of year when lights are shining, caroling is in full swing and the treats are plentiful...But...
I can honestly say that I haven't ever had a Spumoni treat quite like this!  
A few years ago, I was honored to win a National baking contest with the Duncan Hines Company. My inspiration for what I decided to make for that contest was created when I went to the ice cream section looking for goodies and the Spumoni Ice Cream, my childhood favorite, was blinking like a beacon, at least in my head it was. That was the moment I had decided to make a "Holy Spumoni Bundt Cake."  I took all the classic flavors of Pistachio, cherry, chocolate and almond and created something that would stay with me for life.  People in my neck of the woods would refer to me as the Spumoni or Duncan Hines girl.  I had been blessed to fly back to New Jersey twice to visit the Duncan Hines headquarter and be part of an incredible baking  journey. Once I returned home, with a little help from the newspaper in town, people started requesting the Spumoni cake and thus...my Spumoni cupcakes were created.  I've sold many, made many for showers, weddings and general consumption. I love the Spumoni cupcakes and always will. But my need to create something special challenged me and took off when I decided I must create another Spumoni love. And thus the Spumoni Truffle Cake Ball was born. I took all the same tastes and flavors and created a beautiful bon bon that was sure to please and be something new.  I really hope you enjoy the silky chocolate Spumoni truffle that "Enjoy Life Chocolate" was perfectly made for and that "Duncan Hines" cake mix and frosting made this handcrafted treat a whole lot faster to make. Even though these do take a little extra time to make, they are soooo worth it.  Trust me.  Please enjoy this recipe, share it with your friends and family and give credit where credit is due. Thank you for joining me here so I'm able to share more of my treats with you and yours.  Happy Holidays, Merry Christmas and have a wonderful New Year!

Spumoni Truffle Cake Balls Recipe:   
Makes approx: 36 truffles                                                
1 White Cake Mix (I used Duncan Hines)
10 oz Fluffy White Frosting (I used most of the can of Duncan Hines but you can use scratch white frosting)
1 Cup Pistachios (I used salted Roasted, I rinsed them for a few minutes to remove salt)
40 Pistachios, salted and roasted, for top of truffle
2 tsp Almond Extract flavoring
¼ tsp Orange extract flavoring
1 Cup water
3 Ener-g eggs
¼ Cup oil
2-4 drops green food coloring (I like mine to look more on the natural side)
1 jar maraschino cherries (drained and dried)
2- 10oz bags of Chocolate chips (I used Enjoy life Brand)
½-3/4 Cup shortening


Preheat Oven to 350 degrees. Grease a 9 x 11 rectangle pan, In a Blender, mix 1 cup pistachios, 1 cup water, almond and orange extract, ener-g eggs, oil, and blend until thoroughly mixed. Add a few drops of green food coloring.  Blend again.
Add pistachio mixture to cake mix and mix with a mixer on low for 2 minutes and then on high for 2 minutes. Pour mixture into prepared pan and bake for 23-25 minutes.  Cool completely. (Side note* If you want a pistachio cake just to eat...try this one here! With a little sprinkle of powdered sugar, you will love this cake!)


Once cooled, break the cake into chunks and mix in a mixing bowl until it turns to fine crumbs. Add 10 oz of frosting and mix until combined. Using a small cookie scoop (about 1 oz,) scoop out mixture and place on a cookie sheet lined with foil.  Scoop out remaining truffle mixture.

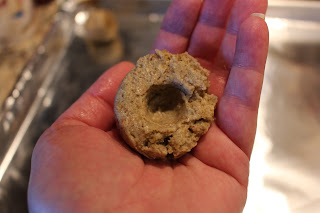
Take one of the scoops at a time, place it in your hand, make an indention with your finger and place a cherry inside the indent. With your fingers, start pinching the mixture around the part of the cherry until it is completely encased. Gently roll the truffle in your hand to get a nice round shape.  Replace on cookie sheet and continue with the remaining truffles. Once all are finished, place cookie sheet in a refrigerator until chilled, about 1-2 hours.  


In a double boiler, heat chocolate chips on low heat stirring constantly until melted. Add 1/4 cup shortening at a time and stir well until you get a slightly thin consistency. Remove cake balls from refrigerator and dip one truffle at a time by placing truffle on the top of the tines of a fork and emerging in chocolate.  Tap fork a few times to remove excess chocolate and place back on the chilled cookie sheet to set. I use a small toothpick to help slide the coated truffle off the fork.   Add one pistachio to the top. Finish remaining truffles and replace cookie sheet in the refrigerator for about 10 minutes. 

 With some of the remaining chocolate, put about 3 tablespoons into a small plastic bag, clip just a small corner of the bag with scissors and drizzle chocolate in a circular direction over the tops of each truffle. Place back into refrigerator until ready to serve. The truffles are the best when they are just at about room temperature. 


One bite of these and you really will experience a new type of Christmas treat. But don't just assume these are for Christmas because once it's over, you are going to want to have these for most of your holidays. These delicious truffles would make a wonderful handmade gift or treat. My daughter specifically asked for 2 dozen of them!
And feel free to experiment with colors too.  White chocolate is beautiful and you can also find green maraschino cherries too. I can't wait to make these for Valentine's day and Easter! Sky's the limit...so bake away, and don't forget to enjoy your TREAT!

Hey You...
Thank you for stopping by to see me.  I'd love it if we could meet up again. Let me know what you think about this recipe and my others by joining me here on the blog, facebook or instagram and share a little love.  Why?  Well, it's because I love you too...
So stay awhile, have a nice beverage of your choice, grab a treat or two and enjoy....


                                                   ©2015 MyDeliciousVeganDiary


Sunday, August 23, 2015

Toasted Coconut Cashews


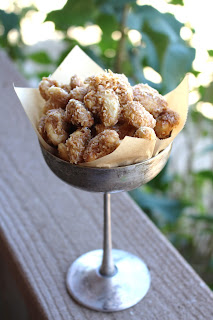
Our Sweet friend Cowboy Mike (no pun intended,) is always on the lookout for  items to share with us that are vegan.  He found a coconut covered cashew candy that was "almost" vegan, at a big box store recently.  To my dismay, there was dairy in it.  Why do "they" always have to toss in the big "D" for almost no reason at all?  Our friend was so nice to try and suprise us with this delectable looking item anyhow.  I decided that I would most definitely recreate this in a non-dairy version. And to our delight...this dream was born. Simple, yummy, elegant or casual...
make ahead of time and store until ready, that is, if you don't munch away on it and it's gone in a day. Yes, I must confess...
almost...
Gone...
in minutes!
Deliciousness!

Toasted Coconut Cashews Recipe~

4 ounces toasted fine shredded coconut
1 1/2 Cups whole raw Cashews
2 Tbs vegan butter
1/2 Cup corn syrup
1/2 Cup brown sugar
1/4 tsp salt
1/4 tsp nutmeg
1 tsp vanilla
1/2 tsp baking soda

Ahead of time, take a cookie sheet and line with aluminum foil.  Pour 2/3 of the coconut mixture on the aluminum foil and spread out. Start by mixing the vegan butter, corn syrup, brown sugar, salt and nutmeg in a shallow pan over high heat.  Once it starts to bubble (as pictured below,) stir in cashews and stir every minute for about 7 minutes.  Remove from heat and add vanilla and baking soda. Stir for about 1 minute and pour mixture on prepared pan.  Top the mixture with the remaining coconut and begin to mix with a flat spatula by placing spatula under the mixture and turning it over and over and over about 20 times until the coconut is coating the cashew pieces and they begin to separate.  At this point, cashews should be slightly cool to touch. Start separating the pieces by hand and then continue to cool. 


These cashews will have a slight crunch with a chew after cooled. The flair of vanilla and toasted coconut will tease your taste buds with non stop yumminess!  These are the perfect little candies to place in a jar with a cute bow and give to your friends for any holiday.  And if you are one of my neighbors and friends...I like these kind of gifts too... Hint, hint!
                                                                           ***

Hey friends...Don't miss a beat!  Find me on Facebook, Instagram and now I'm on snapchat too under mydeliciousvegandiary.   Want the recipe in your inbox? You can sign up for it to be sent there right in the side bar. If you make a recipe, have suggestions or want me to create something for you, let me know.  That's why I'm here! Sending love, sweetness and a whole look of cooking fun! Ciao...


Friday, July 3, 2015

Ranch Cheezball Dip


Here I sit, out in the middle of the Sequoia Trees in the middle of Kern County, California, in a little cabin that used to be a tiny home in a logging town. R Ranch of the Sequoias, as the place is called, is a step back in time. There are no phones, no interruptions from the outside world, just nature and all the creatures that live there. But this place does have a few attractions to keep you connected. It has a huge pool, spa, family game room, adult game room with internet wifi if you don’t mind the 10 minute wait to connect and slow service, a small lake with paddle boats and a way to connect with your family and friends around a fire pit with s’mores and chit chat. This place is heavenly. We love spending our 4th of July here with family and friends, just enjoying each other’s company away from the hustle and bustle of life. It’s our bit of solace and sanity to disconnect from the world and reconnect with those most important to us. And to wake up to the deer running around, the bears hanging out and the fox and raccoon near your door is amazing. The setting is fantastic and since I have done most of my meal prep already, I did a little photo shoot in this amazing setting with my granddaughter this morning too.
 

Another great thing about R Ranch, we do have basic stocked kitchens, cook tops and refrigerators. So when I decided to make this easy Ranch Cheezball Dip recipe, I knew it’d be a snap to make in little than 10 minutes and then I’d be back to my family/ friend time. My inspiration to make this delicious treat came from trying Beanfield’s Bean and Rice Chips at the Vida Vegan Convention in Austin, Texas recently. I couldn’t believe the flavors were so incredibly flavorful and that this chip was crunchy but almost airy too. I fell in love and had the company send me some more. It didn’t take long to know that these chips were heading to my holiday camping vacation with me and that I’d use it a couple ways. And I’m glad I did… and my friends and family were too.


Ranch Cheezball Dip Recipe
8 oz Vegan Cream Cheese
¼ tsp Onion Powder
¼ tsp Garlic Powder
¼ tsp Chopped Dried Dill
¼ tsp Salt
¼ tsp pepper (I used a mix of white, green, black and pink pepper)
1 tsp Dried Parsley
2/3 cup crushed Ranch Bean and Rice Chips, Beanfields Brand (I do half crushed and half finely crushed)
Assorted Chips and Crackers to serve


Mix all ingredients in a bowl until well mixed. Chill in bowl for 5 minutes in your freezer while crushing chips. Remove mixture from bowl and roll into a ball, gently. Roll cream cheezball into chips and place in the refrigerator for about an hour (though, if you are impatient like myself, I dug in immediately. It will just be a bit softer and on a hot day in summer, it won’t keep its pretty shape as long.) Place in center of a dish and layer chips and crackers around the Ranch Cheezball. I added a sprig of fresh Parsley under my Cheezball for not only looks, but to also add a bit of fresh flavor to each bite. Think this is just a dip recipe? Oh gosh no! This is a delicious flavorful spread for a sandwich too and it adds just that perfect bit of crunch that we all crave. Add a slice of vegan turkey, a tomato slice and lettuce and you’ll have a delightful and satisfying meal. Go For it! (I even like to add a few more whole chip pieces on my sandwich too.) You deserve it. Not only for a holiday but for anytime!


Get your coupon Here for Beanfields chips

For more stories, fun and recipes, follow me here. I’d love to hear your thoughts and ideas so please comment. I’m also on Instagram and facebook too!

Friday, June 5, 2015

Berry Vodka Shot


Someday you just have to indulge a little.  And this little Berry Vodka Shot made with none other than Tito's vodka is also a slight nod to the amazing time I had at the Vida Vegan Con blogger's convention a few days ago in Austin, Texas. Yes, this is the birthplace of Tito's vodka and a mecca for Vegan Food Trucks galore. I was in heaven.  Now I'm home, work is calling, kids are calling, my dogs are demanding every last ounce of my attention and I'm mentally wanting a little break.  So as I sit here sipping this berry concoction with a fresh juiced taste, I'm waiting for the next little break in my day to have another one of these little babies.  And to that my hubby even said...Ditto! (Or should I say Tito?)

~Berry Vodka Shot Recipe
4 ounces Chilled Vodka
2 ounces Simple Syrup
5 Chilled Strawberries
1/2 Cup chilled Blueberries

Blend for a few minutes and pour into sugar rimmed glass. Sip and Savor.  (*note~ this will get thick if you let it set for too long.)

Teriyaki Rice Bowl


When I made the choice to go vegan back in 2010 after my doctor recommended it due to a possible cancer diagnosis (and later found out it was), I struggled to find quick and easy meals. One thing that I ate almost every day was canned re-fried beans spread onto a tortilla with a few dashes of hot sauce.  I'd microwave it for 45 seconds and call it a day.  When my daughter went vegan that's what she ate too. We didn't know any vegans that would hold our hand through the process of discovery and what we could eat, and this meal, well, it...got...really...boring!  But, at least I knew I could eat it.  Not only have I come a long way but so have vegan foods and vegan replacement products.  Before we go on...I get it.  50% of you are questioning why I would want to trade chicken for a chicken looking product vs whole foods that don't represent something dead.  Let that be your choice.  We are all coming from different places with different feelings, tastes and cravings.  Let's not judge here but support everyone where they are.  You may like tofu.  I do too sometimes but I love creativity, flavor and sometimes something a bit fun and with texture.   This could be made with tofu but I always stock up on quick and easy foods for days like today!
 
There is this awesome company that found my blog and decided to send me a box of their products to create recipes.  Edward & Sons Trading company is an online store that sells not only Vegan foods, but also gluten free and other organic foods too.  So check them out if you aren't near a local vegan grocer like myself.  But in their box of goodies was a delicious Teriyaki marinade and sauce.  Right away I decided to make a Rice bowl similar to what my father-in-law Gary used to make for the family when we'd go visit.  I'm happy to say...I have a food crush!  This is not only filling and satisfying but delicious and flavorful! This marinade had a nice zing of vinegar, garlic, pepper and ginger with a nice citrus tone. Really really good. 
 
Teriyaki Rice Bowl
~serves 4-5
4 Cups cooked rice
1 1/2 Cups Vegan Chicken (I used Gardein)
5 scallions (green onions) sliced
1/2 Cup sesame seeds (toasted for a few minutes to bring out the flavor)
4-5 ounces Teriyaki sauce (Premier Japan from Edward & Sons is also Gluten Free)
Chopsticks are optional

In a bowl, put about 3/4 cup of rice and 1/2 cup or less of the vegan chicken, and a handful of scallions. Drizzle on an ounce of Teriyaki sauce and sprinkle with sesame seeds. Eat quick if you are in the company of others.  Or guard it like crazy because others will devour their food and comeback for more if you look away.  True story....Eat it quick, or guard it with a lock and key. It's that yummy!

If you like this recipe and desire for more, sign up to get the newest recipes sent directly to your email.  Or like me on facebook for all the updates and contests too. 

Thursday, June 4, 2015

Lemon Caper Tartar Sauce


     The Last few days have been completely lazy days. I just returned home from Austin, Texas.  I was thrilled I was able to attend the Vida Vegan Con for bloggers.  What an incredible learning event.  I can't say enough about the awesome and knowledgeable teachers, the great vegan business and CEO's of the companies, and the many volunteers that put the event together.  My only regret...this was the last put on by this group and I wish I had found them three years earlier.
     Well, I made it through the convention, Pneumonia and all.  Fortunately I was on the tail end and felt much better after a trip to the doctor but it's been very difficult to get back into the groove of things. I am so happy I was able to pick up a few quick items that could be quickly assembled into meals once I returned home and was resting up from the trip. 
     Since I always have my pantry and refrigerator pretty much stocked up with items to make sauces, syrups, pastas, etc.,  it was easy enough to whip up a nice spread for my fish-less sandwich.  And the bagels...nice touch eh?   Well, it's all I had in the freezer, but it worked!   
 
 
Lemon Caper Tartar Sauce Recipe
 
1/2 Tbs Sour Cream (I used Better Than Sour Cream)
1/2 Tbs Veganaise
1 Tsp Horseradish
1 Tsp Capers
1 Tsp Lemon Juice
1 Tsp Chopped Italian Parsley
Dash salt and Pepper to taste
 
Mix all ingredients and spread on Grilled bun or on tofu.
 
Pictured above was my Fish-less Bagel Sandwich made with Gardein Fish-less fillets, Daiya Havarti Style Nut cheese, and Bagels grilled with vegan butter and a nice heaping spoonful of Lemon Caper Tartar Sauce.  This Sauce would also be great with a bit of Sriracha sauce in it and drizzled over Vegan  Fish-less Tacos. Click here for another fish-less recipe-   More Fish-less Tacos 
 
Next on the blog~ Vodka Berry Shot.   A sexy and healthy libation.