Showing posts with label Breakfast. Show all posts

Thursday, November 10, 2016

Cheezy Hash Brown Bake


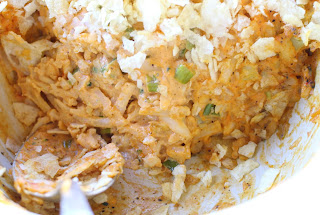
Waking up today hit me like a brick.  The last few days I have been out of sorts since flying back from a work trip in Oregon. I am NOT a morning person at all and I found myself with only 2 hours of sleep, waking up at 2 am to catch a 5 am flight. I spent the day at different airports with layovers dreaming about getting home to make this recipe I have been thinking about creating since before I left for Oregon. So fortunately for me, I had all the ingredients to start making and baking this morning for the hubs and I.  So let me add a little disclaimer here and I hope you've read through so you do see this disclaimer beforehand. They don't call Heidi Ho Spicy Chia Cheeze "Spicy" for no reason.  This puppy has a spicy kick like no bodies business!  I love when I am savoring the flavor and getting that punch of heat.  That heat to me screams metabolism boost and I feel like my body is thanking me for this dish over and over. So now, let's move on. Spicy. Check. Delicious. Check. Something you will want to make for Breakfast, Lunch, Dinner, Holiday's and as a Delicious Side Dish. Check. Pretty Quick to make. Check!
So without further adieu...let's make this baby! 


Cheezy Hashbrown Bake Recipe:

10 oz Heidi Ho Spicy Chia Cheeze
10 oz Frozen Hash Brown Potatoes (thawed)
8 oz Vegan Sour Cream
1/2 C. Sliced Green Onions
6 oz chopped Broccoli
1 Tbs Salt
1 C. Crushed Potato Chips

Heat oven to 350 degrees. Spray baking dish with food release spray. I used a 9 inch round dish that is about 6 inches high.  You can use something that is not as deep but be sure not to let it burn since it will cook quicker.  In a large mixing bowl, add all ingredients but potato chips.  Mix well and pour into baking dish. Add the crushed chips to the top and bake for 45 minutes. Be prepared for delicious smells.  Once out, let cool for about 5-10 minutes.  Eat well friends, eat well.


Hey You... Thank you for stopping by to see me. I'd love it if we could meet up again. Let me know what you think about this recipe and my others by joining me here on the blog, facebook or instagram and share a little love. Why? Well, it's because I love you too... So stay awhile, have a nice beverage of your choice, grab a treat or two and enjoy....
                                                   
                                                       ©2015 MyDeliciousVeganDiary

Saturday, July 30, 2016

Easy Sweet Ricotta Cheese


Ricotta Cheese. One of the worlds great delicacies.  I remember my grandpa Galfano telling me stories about growing up and some of the things he used to love.  One of his favorite things was a Ricotta Cheese Sandwich, with sweet sugar and cinnamon. He said he would have his mother make him 8 sandwiches for work and would eat them all. Back in the day, his sandwich was a dairy one but I know he'd be proud that I have created a sinfully delicious dairy-free version of it.  And when you eat this sandwich, you almost feel as if you are eating a lightly sweetened cake. It's satisfying and so tasty, it's a meal and dessert in one. But this sweetened  Ricotta can be made sweetened or non sweetened for savory dishes also.  Use this Delicious Easy Sweet Ricotta for Bread, Toast, dips, bread puddings, dessert ravioli's or eat it right out of the bowl.  The sky is the limit.  And please do share your favorite way to enjoy this delightful blend. Love ya and happy eating.


Easy Sweet Ricotta Cheese Recipe:
1 C Raw Almonds
1/2 C Califia Vanilla Creamer (I use this brand because of the thickness and hint of sweetness) (For savory, use unsweetened homemade almond milk.)
1/2 Tsp Vinegar

1/2 Tsp Lemon Juice
1/2 Tsp Lemon Rind
1/2 Tsp Nutritional yeast
water as needed

Put almonds in a bowl and soak with boiling water for about an hour.  If the peels pop right off when you pinch the almond, you are good to go.  If not, pour out water and add fresh boiling water for another hour and try again.  Once almonds are peeled, put almonds into a large measuring cup. Add enough water to get to the 2 cup mark.  Add to Vitamix, or blender (a blender will take much longer) and blend until it is mostly smooth. Add the rest of the ingredients and blend for two minutes. Pour into a pan and cook on your stove top on medium heat for 10 minutes stirring every few minutes. Cool for 10 minutes and chill.
Makes 2 1/2 cups. It's freezable too.

One way I use this delicious mixture is to spread on to white bread, sprinkle with sugar and cinnamon. I cut the crusts and cut into small cubes. It's a nice little snack or treat, perfect for afternoon tea, breakfast or heck, I'd eat this all day long for dinner too.
Keep an eye on the blog for other ways to use this culinary treasure also.
Follow me for up to date recipes and contests here, on facebook or on instagram. Happy Making, Baking and Eating...


                                                        ©2015 MyDeliciousVeganDiary


Monday, January 11, 2016

Biscuits And Avocado Sage Gravy


It's breakfast time.  I wake up, walk into the living room/ kitchen to perk myself a cup of coffee.  I sip it as I turn and notice hubby staring at me from the couch.  His google-y eyes are staring into my mind and giving me that "I am starving" look.  "Are you hungry?" I asked. "Yes" said the google-y eye staring man.  That was the start of today. It seems like all we have eaten for the last few weeks since my Pignolata recipe has been Chipotle style sofritas for breakfast.  Day in and day out we have enjoyed this mixture in a burrito wrap but today I simply wanted to make something new.  Something to satisfy the hungriest of hungry men and of course, me.  So going through my pantry, I found a few things to throw this simple tasty meal together.  This Avocado Sage Gravy is going to be something you crave.... with its delicious savory flavors of Sage and Thyme, you may want this every day for a couple of weeks...
if you're anything like me!  Enjoy, share...love!  
 
 
Avocado Sage Gravy Recipe:
 
1 C. TVP or Sausage Flavor TVP (Textured Vegetable Protein)
2 C. Vegetable stock
1/2 Soft Avocado
2 C. Rice Milk
1 Tbs. Vegan Butter
2 Tsp. Sage
1/2 Tsp. Red Pepper Flakes (I like mine hot so I add 1 whole teaspoon.)
1 pinch of Thyme
1 Tsp. Nutritional Yeast
1 Tsp. Liquid Aminos
Salt and Pepper to taste
Thickener:
2 Tbs. Flour plus 4 Tbs. water
Baked Biscuits
 
On high heat, pour TVP into a fry pan, add vegetable stock and stir until it's absorbed.


Add Avocado, Thyme, Sage and mix into TVP mixture until most of the avocado is smooth. Small bits of avocado may remain and that is fine but too big of chunks will make your gravy taste too much like avocado dip.


 Add Rice milk, stir and heat on high heat until mixture starts to bubble.  Add Vegan butter, nutritional yeast and Liquid Aminos, stir, add thickening mixture and stir until it starts to thicken.
 
Add red pepper flakes and salt and pepper to taste.  No salt added will give this dish a very flat and flavorless taste.  I recommend at least 1 Tsp.  Remove from heat and serve up this tasty and delightful savory sauce over fresh hot biscuits.  I used canned biscuits to make this recipe go from quick to speedy. 


Hey Lovely...

Thank you for stopping by to see me.  I'd love it if we could meet up again. Let me know what you think about this recipe and my others by joining me here on the blog, facebook or instagram and share a little love.  Why?  Well, it's because I love you too...

So stay awhile, have a nice beverage of your choice, grab a treat or two and enjoy....

                                                   ©2015 MyDeliciousVeganDiary

Saturday, December 26, 2015

Pignolata


Hey now...
It's time to face the music.  It's the holidays and with the great tradition in keeping up with our relatives of days gone by...we BAKE, and bake and bake and bake. And since you are here on my blog looking at all the yummy sweet treats that I simply can't seem to get enough of, I'm going to assume you are here looking for recipes or simple recipes at best. (If you are just here to  dream or browse, that's alright too but mind your keypad, you don't want to get it all goopy from drooling,  just saying.)
But, perhaps you are here to pass off a to do list of things to bake, to your mom, kids, friend or loved one to make for you this Holiday season or New Year. And if that's true, Great, because this is one of the easiest quickest recipes around.
When my kiddos were younger, I tried to keep our Italian family traditions alive and made delicious meals of Pasta and Italian cookies just like Great Grandma used to make. I would try and make her potatoes, eggs and anything the family talked about...I'd attempt it.
So a few years ago, I was talking to my mother and told her I had found this Pignolata recipe that I had wanted to make for Christmas.  She proceeded to tell me her mom and grandma always made this when she was younger.  Well hello momma...
Did you miss the memo  (Laughing out loud)  about me wanting recipes for our traditions?  Perhaps I jogged her mind of Holiday's past but I was super excited to take an Italian tradition, twist it a bit and make it our own holiday treasure.  So here it is.  And this Pignolata recipe is as easy and simple as you can get. Sweet and Crunchy, we've made this our Dessert and Christmas morning breakfast tradition, just like Great Grandma Randazzo did.

Pignolata Recipe:

1 Can Ready made Biscuit dough
Oil for frying
1/2 Cup Agave
1 Tbs Orange Marmalade
Pinch Cinnamon
Candy sprinkles

Add Oil to a deep pan.  Make sure the oil is about two inches deep.  Heat on high for about 2-3 minutes. Cut each biscuit into 9 small pieces if the biscuits are large, and 6 pieces if the biscuits are small.  Add about 9 pieces at a time to the hot oil stirring while they are cooking.  Once they turn golden brown, remove them with a slotted spoon and place on Paper towel to drain. Finish remaining biscuits.
In a large bowl, mix agave, cinnamon and orange marmalade with a whisk. Add the fried dough to the bowl and stir until all pieces are covered with the mixture.  Place on a dish or bowl and sprinkle with candy sprinkles.  Eat a few and then call your family in to enjoy.  Or go ahead and be nice since tis the season... and share from the get go.  (I was just trying to help you out since they do go really quickly!) 
Enjoy...


Hey Lovely...

Thank you for stopping by to see me.  I'd love it if we could meet up again. Let me know what you think about this recipe and my others by joining me here on the blog, facebook or instagram and share a little love.  Why?  Well, it's because I love you too...

So stay awhile, have a nice beverage of your choice, grab a treat or two and enjoy....

                                                   ©2015 MyDeliciousVeganDiary
 

Thursday, September 18, 2014

Vegan Breakfast Sandwich


Stop what you doing right now. Gaze into this picture. You're getting hungrier and hungrier!  Salivate and then get the goods to make this today!  Trust me, you'll want this for breakfast, lunch and dinner.  I'm not one for bragging but I'm in Love with this Vegan Breakfast Sandwich that I made with a yummy Vegan Horseradish Hollandaise Sauce.   I ate one.  Then another half.  And now...
I crave them all the time.
Sometimes I really luck out with a recipe and by far, this is one of my most favorites eva!


Vegan Breakfast Sandwich recipe~

Brioche Buns, Biscuits, English muffins or even pancakes will work
Gardein Breakfast Patties
Firm Tofu, sliced into 3/4- 1 inch squares
Vegan butter, softened
Salt and Pepper
*Horseradish Hollandaise Sauce (*Recipe below)
Optional: a vegan cheese slice

Heat a fry pan over the stove on medium heat. Butter each inside of the Brioche or your favorite bread and grill in fry pan a few minutes until the bread is nice and toasted brown. Set aside. Add Gardein Breakfast Patties and Grill a few minutes on each side until hot. Set Aside.  Spray one side of tofu with a cooking spray, sprinkle with salt and pepper and fry salted and peppered side down about two minutes until it has a nice browning to it. Spray the top, sprinkle with more salt and pepper and carefully flip to grill the other side.
Assemble the sandwich with one patty, one piece of tofu and about two tablespoons Horseradish Hollandaise sauce....
Drool...then eat...then about now Nirvana will take over your body!  It's truly life changing.  And for those meat eaters in your life, they would never miss an Egg McMuffin after having one of these!


Horseradish Hollandaise Sauce~

1 Tbs vegan horseradish sauce or horseradish Mayo
1 Tbs nutritional yeast
2 Tbs lemon juice
1 pinch salt
3 Tbs rice milk
2 Tbs soft tofu
2 Tbs melted vegan butter or margarine

Combine all ingredients, except butter, in a high powered blender until creamy and smooth.  Add melted butter and blend again. Pour into sauce pan and cook over high heat, stirring frequently until it starts to thicken a bit.  Use it to compliment Vegan Breakfast Sandwiches, Vegetables and Toast. 


Vegan Breakfast Sandwich....Mouthwatering!

Follow me on facebook, instagram and pinterest for new and exciting recipes.  You won't want to miss any of them. 
Thanks for following and see ya'll soon!

Sunday, June 15, 2014

Chorizo Rice Hash


Father's Day...

A day to celebrate the men in our lives. They are the thread of our inner fabric and the reason we came to be. They are our friends, our mentors and our Heroes. Today was the typical father's day breakfast in bed. However, the meal was nothing like our typical meal that the kids used to make with pancakes, bacon (screech, but yes) and potatoes with toast. My kids loved making daddy a manly meal fit for a king. But our king has since joined the ranks of healthy eating, craving great meals instead of portions of meat. Our man loves vegan food, mostly because I strive to make it easy for him to succeed. Let's face it... For some of us that weren't born eating vegan, it's been a tough road. But if you set yourself up for success, a clean pantry, fruits on the counter and skip making your freezer a morgue...then you will succeed. Eating well starts in the home and will follow you anywhere. So after my hubby had this meal, he kept saying how delicious and hearty it was along with it being so satisfying. Father's Day Served!

 
 How about a little bubbly?  A nice cranberry Mimosa to top his meal.  2 parts champagne, 1 part cranberry juice and a floating fresh raspberry or strawberry.
 

What I love about hash is you just throw it in the pan, cook it up and it's done. It's what I call "breakfast simplified!" And pretty much, cook up whatever is leftover in your fridge and you have a hash. For this, I cooked up my leftover sushi rice and zucchinis.

 
Chorizo Rice Hash
 
1 1/2 cups cooked rice
1/2 cup chopped zucchini
5 ounces vegan chorizo
2 green onions sliced
1 tsp garlic
3 ounces soft tofu
1 can refried beans
Salt to taste
 
 
In a hot pan, drizzle a little olive oil and cook the onions and zucchini for 2 minutes on med-high heat. Add the rest of the ingredients and cook for an additional 3- 4 minutes.  The beautiful thing about vegan chorizo...you don't have to worry about cooking it forever to get the "Bugs" out of it. (I know that's gross to put into a recipe but it's true, so grossly true!)
Scoot the hash to one half of the pan and add the can of beans to the other half.  Stir the beans gently until cooked, about 1-2 minutes.  Don't worry if they get mixed a little, but try to keep them separate.  This step is to save time and dishes, and did I mention I hate doing dishes?  Serve with warm tortillas. 


Here is a deliciously hearty meal in less than ten minutes if it's all prepped beforehand.  Enjoy on Father's day or heck...why not make this everyday and celebrate that too!
 
For more fun...Follow me on facebook by clicking below~

Monday, June 9, 2014

Citrus Scones

 
If you haven't noticed by now that the majority of my blog entries are some sort of sweet, they are because I'm still a kid at heart.  I remember growing up, I would always search the house for dessert and once ended up with 6 brownies in my lunch box for school.  My mom still tells the story of me robbing the pantry of all sweets and leaving none for my siblings.  When I'd get in trouble for this act of tyranny, I'd tell myself that when I got older, I'd make all the desserts I want!  Well today I do bake like a crazy woman, feeding my inner child, but because of that middle aged decrease in metabolism I have slowed down a bit on my consumption of these goodies... ( and of course I do feel sorry for my childhood gluttony!)
 
 
Today I made scones for our lazy Sunday.  I wanted a nice treat to follow up with my nice spot of tea.  I wanted to use the lemons and grapefruit that I had on my counter especially since I'm in love with citrus.  And because lately I've been having a bit of issue with gluten, I wanted to make these gluten free too.
 So here we go...
Me in my bake happy state is hoping you enjoy this tasty breakfast treat.
 
Citrus Scones Recipe
 
1 16oz box (2 3/4 cup)of Gluten Free Flour mix  (tip* reserve about 2 Tbs of mix for flouring your counter and baking pan if you don't have any more to use)
1/3 cup Granulated sugar
1 Tbs baking powder
3/4 tsp salt
1/2 cup vegan butter
3 tsp ener-g egg powder
1 tsp chia seeds
3/4 tsp vanilla bean paste or extract
1/2 tsp cornstarch
3 ounces tofu (soft)
1/2 cup- 3/4 cup Coconut milk ( I use canned coconut milk that has cream on the top. I make sure to mostly use the creamy part for this recipe...Do NOT use cream of coconut.)
lemon zest
grapefruit zest
juice from the grapefruit and lemon

1 tsp course granulated sugar for sprinkling

Glaze
Remaining juices, remaining zest
1 1/3 cup powdered sugar

Mix all dry ingredients, flour, sugar, baking powder, salt, egg powder, chia seeds, cornstarch in a bowl. Add butter and mix until butter is the size of small peas. Do not over mix and make sure butter is very cold. Stir in 3/4 of the zest from the grapefruit and lemon (reserving 1/4 of the zest for the glaze.) Mix in another bowl, 1/2 cup milk, 2 tsp of the grapefruit juice and 1 tsp of the lemon juice (reserving all the rest of the juice for the glaze) and tofu . Add wet to dry stirring just until incorporated. Should slightly resemble a pie crust dough. If dough doesn't stick together, add a bit more coconut milk, a little at a time, until it holds together.
On floured counter, divide into two halves and make into the shape of disks about 1- 1 1/2 inch high.  Use a little remainder of the coconut milk to brush the tops of disks and sprinkle with a pinch of granulated sugar. Cut each disk to make 6 pieces. Place pieces onto a cookie sheet, slightly apart to give room for baking all sides.  Bake in preheated oven set at 400 degrees for 20-25 minutes. These should be slightly brown.


Allow to cool a bit while making Glaze. In a bowl, mix juice and zest and add 1/3 cup of powdered sugar at a time, mixing well using a whisk.  You want this to have a nice semi thick consistency that will slowly drizzle over the warm scones. *(use a cookie cooling rack to keep the scones from sitting in the syrup.)  Once the glaze is almost dry, your scone is ready to devour.... enjoy!


Friday, June 6, 2014

Lemon Chia Ricotta & Berry Crepes

So help me, when I crave something, it drives me crazy.  Crazy to the point of obsession is realistically what happens when I really really want something.  A few weeks ago, the hubby and I, along with my grand baby, went to the mall.  Inside the mall is a cute little french bistro type crepe place with a window to watch the crepe making process.  Hubby and I ordered a delicious coffee while I dreamed about making a crepe someday soon.  Well after much pondering and a failed attempt at the first couple, here is my recipe...Chia seeds included!
 
At first I made my beautiful food, took photos and went on to eat these yummies. This is the first time I had taken photos and not checked them before I ate the goods.  I guess I was too excited and missed the part that white crepes in indirect sunlight do not show up...at all. The screen was all white with a nice outline of something that resembled a crepe! 
Well, to my horror, and my tummies delight, fortunately I had some left overs to recreate my photos.  And as for my tummy...seconds of this lovely lemony delight with fresh bursts of flavor and fruity ricotta cheesy goodness along with a little crunch from the chia seeds was perfect.
 
I was happy! And full!
 

 Lemon Chia Ricotta & Berry Crepes

Filling~

1/2 c sliced strawberries
1/2 c black or boysenberries
pinch of sugar
a drip of vanilla
1 c vegan ricotta cheese
1 Tbs sugar
1 Tbs coconut milk or your favorite type.

In a hot pan, slightly cook berries with a pinch of sugar and vanilla.  You just want the flavors to start coming out, about a minute or two on high heat and then set aside to cool.
In a bowl, mix ricotta cheese, sugar and milk.  Set aside while making crepes.

Crepes~

1 Tbs egg replacer
1 Tbs Chia seeds
1 C water
2 Tbs canola oil
2 1/2 C coconut milk (unsweetened)
Lemon zest and 1/2 tsp lemon juice.
2 C cake flour
pinch salt
Powdered sugar for sprinkling and Maple syrup for drizzling.

In a blender, mix egg replacer, chia seeds and water for a minute on high.  Add oil, zest, lemon juice and coconut milk and blend another minute.  Add cake flour, 1/2 cup at a time and blend on high.  Scrape down sides, add salt and mix another few seconds.  Spray a little cooking spray evenly over hot pan.  Wipe of excess and pour a little batter into the center of the pan.  Kind of like you'd make an omelet, using your wrist, lift the pan and slowly swirl the mixture to the outside of the pan in circular motions.  You want this batter to be really thin in the pan.  Cook about a minute until you see the edges lift.  I was able to grab the edge and flip the crepe by hand to cook the other side but feel free to use a spatula. Cook evenly on both sides and stack crepes on a plate as they've cooked.

 
To assemble, spread on a bit of ricotta mixture, a few berries and roll up.


 Sprinkle with Powdered sugar and Eat.  Or just look at them, and then eat them.  Yes, they're that pretty. And also drizzle with Maple syrup for another level of tastiness.
 
Dessert Crepe~
(or breakfast too)
 
Lay crepe flat on a plate.  Drizzle with a little lemon juice.  Sprinkle with a little granulated sugar.  Fold in half and in half again. Drizzle with melted vegan butter and sprinkle with a little more granulated sugar.  Okay now eat...your life is now complete! (At least mine was!) 

 
Like Crepes?  Share what you like to fill yours with and inspire us all.
 
For more fun photos, contests and first to hear news,  follow me on facebook here~

Friday, April 5, 2013

Peaches and Creme Hand Pies

Let's talk breakfast, better yet, desserts.  Well these little gems can be either or.  For these fabulous tasty treats, and boy oh boy do I mean tasty, I'll be using Duncan Hines new Frosting creations Peaches and Creme packet and their Frosting Starter.  Did you know there are quite a few vegan Duncan Hines products?  Well, to my delight, there are a lot of them.   So let's get started on this yummy meal that's sure to please even your most picky eaters.


Peaches and Creme Hand Pies
Ingredients~
1 packet of Duncan Hines® Frosting Creations™ Peaches and Creme Flavor Mix  and 1 can of Frosting Creations™ Frosting Starter
8 oz Vegan gourmet cream cheese
1 can Duncan Hines/ Comstock Peach pie filling
1 tbs sugar
1 can refrigerated canned biscuits
flour for dusting

Heat oven to 350 degrees.  Mix vegan cream cheese, sugar and 3/4 of the Peaches and Creme packet (about 3/4 tsp) in a bowl. 

Set the reserved peaches and cream packet aside (about 1/4 tsp) in another small bowl for later.
Dust a small area with flour.  Roll out each biscuit into a flat round.  Add 1/2 tsp of cream cheese mixture and add 1/2 tsp of Peach pie filling on top.

Get a small bowl with a little bit of water, dip your finger and lightly wet one half of the inside edge of the biscuit.  Fold the biscuit over and seal the edge with pressing down gently with a fork.

Bake for 10 minutes until golden brown.
While cooling, take the bowl with the reserved Duncan Hines® Frosting Creations™ Peaches and Creme Flavor Mix  and add 4 Tbs of a can of Frosting Creations™ Frosting Starter and mix well.  Add this mixture to a baggy, cut the tip, and drizzle onto the baked hand pies.

  Now this final tip is a must...Enjoy, enjoy...enjoy!  And I know you will!

*note~ refrigerate additional unused can of Frosting Creations™ Frosting Starter  for another use at a later time.

Saturday, February 2, 2013

Tex-Mex Tofu Scramble With Beans


Eating vegan sometimes isn't easy for me when it comes to breakfast.  I always seem to go automatically to oatmeal, breads or sugary desserts. Carb-O-Holic is what I am. But sometimes I simply crave eggs.  While walking through San Antonio on a recent trip to Texas, one can't notice all the Tex-Mex restaurants to eat at. Then it popped into my head...
    Why not create a tofu scramble with that little bit of Texas Flair! (Did I mention I looooove Texas? Well, I did now.)

Tex-Mex Tofu Scramble

Ingredients~
1 Block soft Tofu
1/4 cup Rotelle Tomatoes. I used the spicy ones. OLE! ;)
1 tsp jalapeno grape seed oil (for flavor but you can omit this is and use regular oil if needed)
Texas Steak Seasoning or any other steak seasoning you prefer. (note~if it doesn't have salt in it, use a little bit of salt too)
1/2 can of Pinto beans,  a whole can for more people or if you are just out right hungry. =)

This is such a simple quick dish to make.  First I took the oil and heated it into the pan.  I added the tofu and started breaking it up and sauteing it.  After a few minutes, I added the Rotelle and stirred it until most of the liquids had started to evaporate.  I added the beans and cooked them till warm.  A quick sprinkle with Steak seasoning and the dish is done.


Here I added a little bit of home fries and a tortilla .  Turning this into a mini burrito was yummy too. As far as eggs, they weren't missed since this little ensemble tasted so much like them. I'm one Happy Texas Camper now. =) 


Saturday, January 12, 2013

Bread Pudding


Lately I have had a big sweet tooth. I was going through my pantry and refrigerator tonight looking for a quick fix.  I decided to try and throw together a bread pudding. I used to make a lot of them but I was so used to using half a dozen eggs in the old days and now I needed to concoct a vegan version. All I have to say is that it was the bomb!  My non vegan hubby didn't know it was vegan and when I let him finish my bread pudding, he simply said it was "Amazing, a true party in his mouth."  Then I told him it was Vegan.  He smiled really big!


Bread Pudding~

5 slices bread cut into squares, the less fresh, the better
1/4 c. coconut cream (from the top of canned coconut milk is best)
1/3 c. powdered sugar plus a little bit more to sprinkle the tops
1 tsp corn starch
1 tsp vanilla
5.3 ounce container of Banana, Mango or Coconut Tofu Dessert (I have pictured Coconut but I actually used Banana this time)


Mix all ingredients really well in a blender or mixer.
 
Cut bread into chunks.
 
Mix the bread into the mixture gently coating it.
 
Pour into lightly greased dishes. Bake @350 degrees for 25 minutes. Once done, broil the top for about 3 minutes more until nicely browned on top.
 
Sprinkle with powered sugar and enjoy!
 
 
Here is another one I made using coconut tofu dessert, blackberries and fresh ginger.