Showing posts with label candy. Show all posts

Wednesday, December 23, 2015

Spumoni Truffle Cake Balls


 It's that magical time of year when lights are shining, caroling is in full swing and the treats are plentiful...But...
I can honestly say that I haven't ever had a Spumoni treat quite like this!  
A few years ago, I was honored to win a National baking contest with the Duncan Hines Company. My inspiration for what I decided to make for that contest was created when I went to the ice cream section looking for goodies and the Spumoni Ice Cream, my childhood favorite, was blinking like a beacon, at least in my head it was. That was the moment I had decided to make a "Holy Spumoni Bundt Cake."  I took all the classic flavors of Pistachio, cherry, chocolate and almond and created something that would stay with me for life.  People in my neck of the woods would refer to me as the Spumoni or Duncan Hines girl.  I had been blessed to fly back to New Jersey twice to visit the Duncan Hines headquarter and be part of an incredible baking  journey. Once I returned home, with a little help from the newspaper in town, people started requesting the Spumoni cake and thus...my Spumoni cupcakes were created.  I've sold many, made many for showers, weddings and general consumption. I love the Spumoni cupcakes and always will. But my need to create something special challenged me and took off when I decided I must create another Spumoni love. And thus the Spumoni Truffle Cake Ball was born. I took all the same tastes and flavors and created a beautiful bon bon that was sure to please and be something new.  I really hope you enjoy the silky chocolate Spumoni truffle that "Enjoy Life Chocolate" was perfectly made for and that "Duncan Hines" cake mix and frosting made this handcrafted treat a whole lot faster to make. Even though these do take a little extra time to make, they are soooo worth it.  Trust me.  Please enjoy this recipe, share it with your friends and family and give credit where credit is due. Thank you for joining me here so I'm able to share more of my treats with you and yours.  Happy Holidays, Merry Christmas and have a wonderful New Year!

Spumoni Truffle Cake Balls Recipe:   
Makes approx: 36 truffles                                                
1 White Cake Mix (I used Duncan Hines)
10 oz Fluffy White Frosting (I used most of the can of Duncan Hines but you can use scratch white frosting)
1 Cup Pistachios (I used salted Roasted, I rinsed them for a few minutes to remove salt)
40 Pistachios, salted and roasted, for top of truffle
2 tsp Almond Extract flavoring
¼ tsp Orange extract flavoring
1 Cup water
3 Ener-g eggs
¼ Cup oil
2-4 drops green food coloring (I like mine to look more on the natural side)
1 jar maraschino cherries (drained and dried)
2- 10oz bags of Chocolate chips (I used Enjoy life Brand)
½-3/4 Cup shortening


Preheat Oven to 350 degrees. Grease a 9 x 11 rectangle pan, In a Blender, mix 1 cup pistachios, 1 cup water, almond and orange extract, ener-g eggs, oil, and blend until thoroughly mixed. Add a few drops of green food coloring.  Blend again.
Add pistachio mixture to cake mix and mix with a mixer on low for 2 minutes and then on high for 2 minutes. Pour mixture into prepared pan and bake for 23-25 minutes.  Cool completely. (Side note* If you want a pistachio cake just to eat...try this one here! With a little sprinkle of powdered sugar, you will love this cake!)


Once cooled, break the cake into chunks and mix in a mixing bowl until it turns to fine crumbs. Add 10 oz of frosting and mix until combined. Using a small cookie scoop (about 1 oz,) scoop out mixture and place on a cookie sheet lined with foil.  Scoop out remaining truffle mixture.

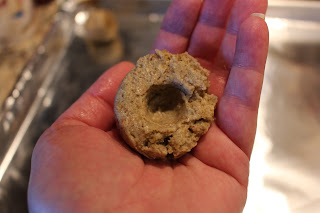
Take one of the scoops at a time, place it in your hand, make an indention with your finger and place a cherry inside the indent. With your fingers, start pinching the mixture around the part of the cherry until it is completely encased. Gently roll the truffle in your hand to get a nice round shape.  Replace on cookie sheet and continue with the remaining truffles. Once all are finished, place cookie sheet in a refrigerator until chilled, about 1-2 hours.  


In a double boiler, heat chocolate chips on low heat stirring constantly until melted. Add 1/4 cup shortening at a time and stir well until you get a slightly thin consistency. Remove cake balls from refrigerator and dip one truffle at a time by placing truffle on the top of the tines of a fork and emerging in chocolate.  Tap fork a few times to remove excess chocolate and place back on the chilled cookie sheet to set. I use a small toothpick to help slide the coated truffle off the fork.   Add one pistachio to the top. Finish remaining truffles and replace cookie sheet in the refrigerator for about 10 minutes. 

 With some of the remaining chocolate, put about 3 tablespoons into a small plastic bag, clip just a small corner of the bag with scissors and drizzle chocolate in a circular direction over the tops of each truffle. Place back into refrigerator until ready to serve. The truffles are the best when they are just at about room temperature. 


One bite of these and you really will experience a new type of Christmas treat. But don't just assume these are for Christmas because once it's over, you are going to want to have these for most of your holidays. These delicious truffles would make a wonderful handmade gift or treat. My daughter specifically asked for 2 dozen of them!
And feel free to experiment with colors too.  White chocolate is beautiful and you can also find green maraschino cherries too. I can't wait to make these for Valentine's day and Easter! Sky's the limit...so bake away, and don't forget to enjoy your TREAT!

Hey You...
Thank you for stopping by to see me.  I'd love it if we could meet up again. Let me know what you think about this recipe and my others by joining me here on the blog, facebook or instagram and share a little love.  Why?  Well, it's because I love you too...
So stay awhile, have a nice beverage of your choice, grab a treat or two and enjoy....


                                                   ©2015 MyDeliciousVeganDiary


Sunday, August 23, 2015

Toasted Coconut Cashews


Our Sweet friend Cowboy Mike (no pun intended,) is always on the lookout for  items to share with us that are vegan.  He found a coconut covered cashew candy that was "almost" vegan, at a big box store recently.  To my dismay, there was dairy in it.  Why do "they" always have to toss in the big "D" for almost no reason at all?  Our friend was so nice to try and suprise us with this delectable looking item anyhow.  I decided that I would most definitely recreate this in a non-dairy version. And to our delight...this dream was born. Simple, yummy, elegant or casual...
make ahead of time and store until ready, that is, if you don't munch away on it and it's gone in a day. Yes, I must confess...
almost...
Gone...
in minutes!
Deliciousness!

Toasted Coconut Cashews Recipe~

4 ounces toasted fine shredded coconut
1 1/2 Cups whole raw Cashews
2 Tbs vegan butter
1/2 Cup corn syrup
1/2 Cup brown sugar
1/4 tsp salt
1/4 tsp nutmeg
1 tsp vanilla
1/2 tsp baking soda

Ahead of time, take a cookie sheet and line with aluminum foil.  Pour 2/3 of the coconut mixture on the aluminum foil and spread out. Start by mixing the vegan butter, corn syrup, brown sugar, salt and nutmeg in a shallow pan over high heat.  Once it starts to bubble (as pictured below,) stir in cashews and stir every minute for about 7 minutes.  Remove from heat and add vanilla and baking soda. Stir for about 1 minute and pour mixture on prepared pan.  Top the mixture with the remaining coconut and begin to mix with a flat spatula by placing spatula under the mixture and turning it over and over and over about 20 times until the coconut is coating the cashew pieces and they begin to separate.  At this point, cashews should be slightly cool to touch. Start separating the pieces by hand and then continue to cool. 


These cashews will have a slight crunch with a chew after cooled. The flair of vanilla and toasted coconut will tease your taste buds with non stop yumminess!  These are the perfect little candies to place in a jar with a cute bow and give to your friends for any holiday.  And if you are one of my neighbors and friends...I like these kind of gifts too... Hint, hint!
                                                                           ***

Hey friends...Don't miss a beat!  Find me on Facebook, Instagram and now I'm on snapchat too under mydeliciousvegandiary.   Want the recipe in your inbox? You can sign up for it to be sent there right in the side bar. If you make a recipe, have suggestions or want me to create something for you, let me know.  That's why I'm here! Sending love, sweetness and a whole look of cooking fun! Ciao...


Sunday, June 29, 2014

Lavender Toffee Sauce

 
Oh Boy...Toffee Sauce.  While some call it Toffee Sauce, others call it caramel sauce but I call it Heaven on Earth. Yes, there's nothing better to dip a nice tart apple into, drizzle over your favorite ice cream or eat right off the spoon. This recipe is for two servings but let's be honest, it's really for one. I had good intentions on sharing but once it was made and my family still hadn't made it home, I noticed slowly but surely, it dwindled down until every bit was gone. I don't know why but it just happened this way.  This dairy free option for heavenly goodness is going to make you go back for seconds and then, you'll need to make a second batch for your family and friends to try. Or just make a bunch of this from the get go. You can double the recipe easily. Make this yummy treat right in your microwave in minutes.


Look at those beautiful bits of vanilla bean seeds peeking through this caramel-y goodness. Be still my heart!

 
Lavender Toffee Sauce Recipe
 
(recipe for 2-4, but can be doubled for 4-8)
 
2 Tbs Vegan Butter
1/3 C Brown Sugar
1/3 C Canned Coconut Milk, using the cream on top ( It's best to use a high quality with thick cream on top)
1/4 tsp Vanilla Bean Paste
Pinch Salt
Pinch dried and finely pulverized lavender ( I use a coffee grinder for mine)
 
In a microwave safe bowl, melt vegan butter.  Add brown sugar, coconut milk cream and stir.  Microwave for 2 minutes.  Stir. Microwave for another  1- 1 1/2 minutes depending on your microwave.  Add the vanilla, pinch salt, lavender and stir.  Let sit on the counter for about 5 minutes.  Once it starts to cool, it will thicken.  Add apples, cake, cupcakes...pretty much anything you want to coat in a delicious toffee caramel or just add a spoon. You'll thank me later. 
 
 Follow me on Facebook and on Instagram.


Wednesday, July 10, 2013

Chocolate covered caramel candies

Valentine's Day was upon us.  I was craving chocolate covered caramels like nobodies business.  A few months back, my friend had bought her and I a chocolate and caramel making class gift certificate.  We watched and learned the secrets to making delicious candies.  And then it hit me...
Could I make this vegan?  I wasn't sure but since the urge to eat caramel was taking over my mind and soul, I figured I had better get cracking at it and see.  To my delight, and the other sweet valentine's in my family, it did!


Chocolate covered caramels
2 cups sugar
2 cups canned coconut milk (the kind with a thick layer of cream on top)
1/4 cup corn syrup
2 cups vegan chocolate
sea salt or lavender sugar or both

Heat pan really hot over stove. Add 1/8 c sugar and as it starts to bubble and brown, stir.  Once melted, add another 1/8 cup sugar and repeat process until all sugar is liquefied.  Add corn syrup and stir again until bubbly.  You are looking for a nice caramel color.  Add coconut milk slowly and stir until all is incorporated.  Be careful of spitting, hot sugar.
After all cream has been added, cook and stir once in awhile until candy thermometer reaches 250 degrees or almost hard ball stage, then remove from heat.
Pour into a tin foil lined and greased 8x8 or 9x13 pan. Let cool.
In a double boiler, melt chocolate.  Cut caramels into squares and dip.   Put dipped caramels onto tin foil, sprinkle with a pinch of sea salt or lavender sugar and refrigerate.  When you are ready to serve, serve at room temperature.

Monday, June 3, 2013

Peaches and Creme Cobbler fudge


Oh Boy Fudge!  Who doesn't crave a nice creamy piece of lovely fudge every once in awhile?  I don't know about you but I sure do.  Fudge takes me right back to feeling like a kid and brings back fond memories of the Circus Circus fudge and candy shop I had visited in Las Vegas. One incredible plus besides the already fabulous taste to this recipe is that it's only 4 ingredients. So here's to memories old and memories new with this wonderful twist on a peaches and Creme Cobbler....Fudge!
 
So let's begin with a few simple ingredients for the fudge:
 
 
Peaches and Creme Fudge:
15 ounces Vegan white Chocolate
1 container ricemellow creme
1 Duncan Hines Frosting Creation packet limited edition peaches and creme or your favorite flavor
Topping:
3 Vegan graham crackers crushed into crumbs


Begin by covering an 8x8 pan with foil and spray lightly with non dairy cooking spray.


Over double boiler, melt white chocolate and remove from heat.

 
Add Duncan Hines frosting creations flavor packet and stir well.

 
Fold in ricemellow until incorporated.

 
Pour into prepared pan.


Add crumb topping by sprinkling and gently pressing into fudge.
 
Chill  for 2 hours.  Make sure to keep these pieces of fudge cool since heat is not their friend at all. Serve and enjoy...


Wednesday, November 21, 2012

Vegan Cranberry Pecan Brittle

The Holidays are upon us.  As I was cooking up some cranberries for some Cranberry Fudge (non vegan) I was about to make for Thanksgiving, I ended up with a lot of left over cranberry juice and I had an Epiphany.  I was wondering if I could turn these leftovers into a nice vegan candy brittle for my daughter.  It was worth a try and it was better than tossing out the remnants.  I do apologize however, had I know this would work, I would have taken photos all along the way.  But I'll try and explain it well enough.  I hope you enjoy this because we sure did.
 
Vegan Cranberry Pecan Brittle Recipe:
 
12 oz bag fresh cranberries
1 1/4 Cup sugar
1 cup corn syrup
1 cup water
3/4 chopped pecans
2 tbsp vegan butter
1tsp baking soda
sugar to sprinkle
 
Start by preparing a cookie sheet with tin foil lightly sprayed with cooking oil spray.  In a medium pan over med-high heat, boil water,  only 1 cup sugar and cranberries for about 30 minutes letting the water start to reduce.   The cranberries will start to soften and look like the photo below.  Remove the cranberries.  (You won't need them so feel free to put them in any other recipe like fudge, ice cream, stuffing, etc.)


Boil your mixture until it reduces to half.  This will be about 15 minutes or longer.  Just stir every once in awhile. Once reduced, add corn syrup, remaining 1/4 sugar and cook for another 5 minutes. Add the pecans and cook using a candy thermometer.  You will be stirring for quite awhile until it registers 300 degrees Fahrenheit. This will be hard ball stage where you can also test by putting a bit of the syrup into ice cold water.  If it is brittle, it's done.   Once it's done, remove it from heat and add the butter stirring quickly, then the baking soda. It will turn a light color and immediately pour onto the prepared foil.  Using two forks, spread it apart quickly, sprinkle lightly with sugar and allow it to cool. Once cooled, break into pieces. Enjoy!


This little treat is a perfect fall or Christmas candy and would make great homemade gifts too. You could even add a little tag reading.. "I cran-berry wait to see you this holiday."  Hee hee..hoo hoo hoo, Merry Christmas and Happy New Year!