Wednesday, December 14, 2016

Hot Spiced Nutty Nog


My lovely daughter and her awesome hubby stopped by for an impromptu visit.  It was great. I do love my company and  I did happen to get out of my jammies before they arrived (it was already passed 2pm). When they do come to visit, normally I always make something new for them to try since they are most definitely two of my best taste testers around.  And I know my daughter loves the comfort of home where she knows momma will make her the best Vegan meals, drinks or treats around. And that my friends, brings me absolute joy!
My daughter had told me she wanted to stop by so she could try and get into the Christmas mood by seeing the décor of the house. And since I had been wanting to make my own quick nog recipe for awhile, and what couldn't be more Christmas-y but Nog, I decided today was the day for it.  Even though it is more like a delicious coffee-less latte, I think you will really really like this hot holiday drink. It's really quick and easy and is not only a Fall or Winter Drink but I could lap this delicacy up all year long, even cold during the summer months.  So try it and I hope you like it!

Hot Spiced Nutty Nog Recipe:

1 Quart Vanilla Almond Milk
2 Cinnamon sticks
1/2 Tsp Almond extract
1/2 Tsp Vanilla
5 Tbs Brown Sugar
1/4 C Spiced Rum
Dash of Nutmeg for the top
 
Put all ingredients except Rum and nutmeg in a pot on the stove and cook over high heat until bubbling and then simmer for a few minutes stirring a couple of times. Turn off stove and stir in Rum.  Serve Immediately with a sprinkle of nutmeg.   You can increase the recipe and heat it then add to a crockpot to keep hot for serving during a party too.  Be sure to add the alcohol and nutmeg to the crock pot right before the party.  Enjoy!  


Hey You...

Thank you for stopping by to see me.  I'd love it if we could meet up again. Let me know what you think about this recipe and my others by joining me here on the blog, facebook or instagram and share a little love.  Why?  Well, it's because I love you too...

So stay awhile, have a nice beverage of your choice, grab a treat or two and enjoy....

                                                   ©2015 MyDeliciousVeganDiary


Hot Gingerbread Boy


With the Holidays in full steam ahead, every time I pass Christmas lights, a Santa Claus, a candy cane or Holiday Display, all can think of is Gingerbread!  Normally by this time I have already whipped up and eaten a few Gingerbread cakes and cookies but because of my crazy work schedule and business, I have not.  So with every passing moment, my body craves to no end the delicious flavors or ginger, molasses and spice and I am dying here! Okay, I'm not dying but really...I needed Gingerbread like NOW!
Then just like the Christmas story..."When all of a sudden there rose such a Clatter," I was in my pantry tossing items on my counter with the impending joy of creating a recipe that might just curb that appetite I had brewing inside me!
So now that I whipped up a batch and it's Kimmie and Hubby approved, here it is for your Holiday enjoyment! And guess what? This is so easy peasy and quick!
 
Hot Gingerbread Boy Recipe:
1 Quart Vanilla Almond Milk
2 Cinnamon sticks
3/4 Tsp Ginger spice
1/2 Tsp Vanilla
5 Tbs Brown Sugar
1 1/2 Tsp Molasses
 
Put all ingredients in a pot on the stove and cook over high heat until bubbling and then simmer for a few minutes stirring a couple of times.  Serve Immediately.   You can increase the recipe and heat it then add to a crockpot to keep hot for serving during a party too.  Enjoy!  
 

Hey You...

Thank you for stopping by to see me.  I'd love it if we could meet up again. Let me know what you think about this recipe and my others by joining me here on the blog, facebook or instagram and share a little love.  Why?  Well, it's because I love you too...

So stay awhile, have a nice beverage of your choice, grab a treat or two and enjoy....

                                                   ©2015 MyDeliciousVeganDiary


Thursday, November 10, 2016

Cheezy Hash Brown Bake


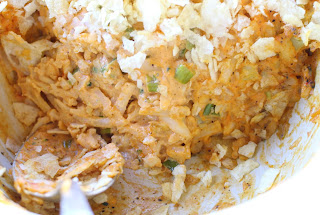
Waking up today hit me like a brick.  The last few days I have been out of sorts since flying back from a work trip in Oregon. I am NOT a morning person at all and I found myself with only 2 hours of sleep, waking up at 2 am to catch a 5 am flight. I spent the day at different airports with layovers dreaming about getting home to make this recipe I have been thinking about creating since before I left for Oregon. So fortunately for me, I had all the ingredients to start making and baking this morning for the hubs and I.  So let me add a little disclaimer here and I hope you've read through so you do see this disclaimer beforehand. They don't call Heidi Ho Spicy Chia Cheeze "Spicy" for no reason.  This puppy has a spicy kick like no bodies business!  I love when I am savoring the flavor and getting that punch of heat.  That heat to me screams metabolism boost and I feel like my body is thanking me for this dish over and over. So now, let's move on. Spicy. Check. Delicious. Check. Something you will want to make for Breakfast, Lunch, Dinner, Holiday's and as a Delicious Side Dish. Check. Pretty Quick to make. Check!
So without further adieu...let's make this baby! 


Cheezy Hashbrown Bake Recipe:

10 oz Heidi Ho Spicy Chia Cheeze
10 oz Frozen Hash Brown Potatoes (thawed)
8 oz Vegan Sour Cream
1/2 C. Sliced Green Onions
6 oz chopped Broccoli
1 Tbs Salt
1 C. Crushed Potato Chips

Heat oven to 350 degrees. Spray baking dish with food release spray. I used a 9 inch round dish that is about 6 inches high.  You can use something that is not as deep but be sure not to let it burn since it will cook quicker.  In a large mixing bowl, add all ingredients but potato chips.  Mix well and pour into baking dish. Add the crushed chips to the top and bake for 45 minutes. Be prepared for delicious smells.  Once out, let cool for about 5-10 minutes.  Eat well friends, eat well.


Hey You... Thank you for stopping by to see me. I'd love it if we could meet up again. Let me know what you think about this recipe and my others by joining me here on the blog, facebook or instagram and share a little love. Why? Well, it's because I love you too... So stay awhile, have a nice beverage of your choice, grab a treat or two and enjoy....
                                                   
                                                       ©2015 MyDeliciousVeganDiary

Tuesday, October 11, 2016

Vegan Beef Potpie


If you haven't scoured through a few of my recipes yet to figure out what kind of a cook or baker I am, let me just tell you...
I'm that Italian girl that likes to offer you a second helping of dessert while making some sort of homestyle supper. Don't get me wrong, I really love fancy too but my stomach says "Make me something hearty and filling" and this recipe is what comes to mind.  Sometimes I like to make my Vegan Beef Potpie with quick and easy biscuits and sometimes I take the extra time, when I am not starving, and make pie crusts scratch. Potpies have always been a family favorite of ours so it is nice and comforting to warm the souls of your little ones with this deliciousness. But it is up to you, either crust you choose, it is really about the moist and flavorful goodness in the middle.  So pull up a chair and let's start cooking!

Vegan Beef Potpie

2 C. Carrots and Potatoes (1 C. of each)
1 Medium sized diced Onion
½ C. Beef Crumble (I used Gardein)
1 Tbs minced Garlic
3 Tbs Beef Seasoning (This is a powder form that can be made into a soup stock but you can replace it with Chick’n or Veggie stock seasoning in powder or concentrate form)
½ C. Peas
1 C. Unsweetened Almond Milk (I like to make mine scratch)
2 Bay leaves
1 Tsp Thyme
½ C. Water
1 Tbs Worcestershire Sauce
1 Tube canned Biscuits
1 Tbs Melted Vegan Margarine
Salt and pepper to taste

Boil Potatoes, carrots, Beef Seasoning and thyme in a medium sized stock pot over medium heat with ½ c water and ½ c almond milk for 10 minutes. Stir a few times in between. Add Bay Leaves, Onion, Garlic, Beef Crumble, Worcestershire sauce and the additional ½ C. Almond Milk for 15 more minutes on low or until 3/4 of the liquid has boiled down.  Remove Bay Leaves, add the peas, stir and turn off. Grease an 8 inch round baking dish and pour mixture in.


 Cut Biscuits into quarters and place on top of mixture. Bake at 350 degrees for 18 minutes or until biscuits are browned and cooked when pierced with a toothpick. Brush top with Melted Margarine and sprinkle with a pinch of salt.  Serve immediately.  Serves 3-4.

Hey Fabulous You...
Thank you for stopping by to see me.  I'd love it if we could meet up again. Let me know what you think about this recipe and my others by joining me here on the blog, facebook or instagram and share a little love.  Why?  Well, it's because I love you too...
So stay awhile, have a nice beverage of your choice, grab a treat or two and enjoy....
                                                   ©2015 MyDeliciousVeganDiary


Monday, August 29, 2016

Key Lime Mini Cheesecakes


So it was Hubby's Birthday. I wanted to make him something really special.  Since Key Lime Pie is his delicious choice for a dessert and I just happened to have graham crackers and leftover Easy Sweet Ricotta in my refrigerator, I decided that I could whip up a quick batch of Key Lime Cheesecake Shooters for him and I and an extra one for my sweet daughter Kailey.  Then when he got home, I'd surprise him and we could celebrate with these little lime treats that packed a punch of flavor.  Flavor, and lots of it. Flavor that shouted out to the quietest of taste buds to demand an encore.  Yep...
I think we all agreed that this sweet little treat made with Easy Sweet Ricotta had all the taste and flavor of a Key Lime pie but these cuties were much easier on the waistline too. Small treat with Big Flavor and it was right up my alley, and hubby's too! Happy Birthday Honey Bunny! 

Key Lime Cheesecake Recipe:

Crust:
1/2 Tsp Vegan margarine, melted
1/4 C Graham Cracker Crumbs
Filling:
1/2 Cup Sweet Ricotta (recipe here: Easy Sweet Ricotta Cheese)
1/4 Tsp Lime rind
Juice of 1 regular lime (This is not a key lime but a regular lime.  With the rind, the juice and the Curd, this will resemble a similar flavor to key lime.)
1 Tbs. Sugar
Lime Curd:
Juice of 1 lime
1 Tsp sugar
2 Tbs Vegan margarine
1/2 Tsp cornstarch mixed with 1 Tsp water

In a small bowl, mix melted margarine with graham cracker crumbs gently with a fork.  Split up into four 4 oz glasses or Six to eight 2 oz glasses. Spoon evenly into glasses. Pack mixture gently with your fingers. Set aside.
Make Filling by mixing Sweet Ricotta mixture with Lime Rind, juice and sugar in a bowl by hand. Spoon a few tablespoons of mixture at a time in the glasses over the graham cracker. Divide what is left little by little so that each glass has an even amount of Ricotta mixture in it. Refrigerate while making Curd.


To make the Lime Curd, melt vegan margarine in a small pan over medium heat. Whisk in sugar and lime juice. Add the cornstarch mixture and continue to stir for a few minutes until it begins to thicken.


Spoon about a teaspoon or two, depending on the glass you use, over the
Ricotta Cheese mixture and place back in the refrigerator to chill for at least an hour or overnight.


Voila! Yummy.  Enjoy!


Happy Making, Baking and Eating! Follow me here, or on Facebook, Instagram or twitter for more fun, contests and recipes. 
        ©2015 MyDeliciousVeganDiary

Saturday, July 30, 2016

Easy Sweet Ricotta Cheese


Ricotta Cheese. One of the worlds great delicacies.  I remember my grandpa Galfano telling me stories about growing up and some of the things he used to love.  One of his favorite things was a Ricotta Cheese Sandwich, with sweet sugar and cinnamon. He said he would have his mother make him 8 sandwiches for work and would eat them all. Back in the day, his sandwich was a dairy one but I know he'd be proud that I have created a sinfully delicious dairy-free version of it.  And when you eat this sandwich, you almost feel as if you are eating a lightly sweetened cake. It's satisfying and so tasty, it's a meal and dessert in one. But this sweetened  Ricotta can be made sweetened or non sweetened for savory dishes also.  Use this Delicious Easy Sweet Ricotta for Bread, Toast, dips, bread puddings, dessert ravioli's or eat it right out of the bowl.  The sky is the limit.  And please do share your favorite way to enjoy this delightful blend. Love ya and happy eating.


Easy Sweet Ricotta Cheese Recipe:
1 C Raw Almonds
1/2 C Califia Vanilla Creamer (I use this brand because of the thickness and hint of sweetness) (For savory, use unsweetened homemade almond milk.)
1/2 Tsp Vinegar

1/2 Tsp Lemon Juice
1/2 Tsp Lemon Rind
1/2 Tsp Nutritional yeast
water as needed

Put almonds in a bowl and soak with boiling water for about an hour.  If the peels pop right off when you pinch the almond, you are good to go.  If not, pour out water and add fresh boiling water for another hour and try again.  Once almonds are peeled, put almonds into a large measuring cup. Add enough water to get to the 2 cup mark.  Add to Vitamix, or blender (a blender will take much longer) and blend until it is mostly smooth. Add the rest of the ingredients and blend for two minutes. Pour into a pan and cook on your stove top on medium heat for 10 minutes stirring every few minutes. Cool for 10 minutes and chill.
Makes 2 1/2 cups. It's freezable too.

One way I use this delicious mixture is to spread on to white bread, sprinkle with sugar and cinnamon. I cut the crusts and cut into small cubes. It's a nice little snack or treat, perfect for afternoon tea, breakfast or heck, I'd eat this all day long for dinner too.
Keep an eye on the blog for other ways to use this culinary treasure also.
Follow me for up to date recipes and contests here, on facebook or on instagram. Happy Making, Baking and Eating...


                                                        ©2015 MyDeliciousVeganDiary


Tuesday, April 26, 2016

Scaloppine Beer Sauce


Wait What? Beer?
Did I really say Beer? Yes...I...Did!
So let me tell you a story about sugar!  I am on a diet, well sort of. And on this diet of mine, I replace meals with lemonade, maple syrup and cayenne juice and then limit eating to once a day.  I am also trying to reduce the amount of sugar I eat by a bunch.  (I did say limit, not delete it completely because that would take me over the edge right now.)  But, even as a vegan, know this...You can Gain Weight!  Trust me, I see it all the time and I myself had decided in 2010 that if I had to cut out meat, I would make delicious desserts as a trade off.  And guess what, low and behold? I gained...
Not only will desserts add to the waistline, but so will eating out and snacking on Vegan fast food.  So this is just a bit of a warning but I won't preach anymore on the subject...today. So you ask what Beer and my sugar warning have in common? Here we go...
So I  gave my one meal a lot of thought.  I was craving pasta but didn't want a traditional red sauce since that is my norm in my Italian home.  Alfredo sauce was something I had just made this week also so scratch that idea. Since I had a rather large bag of lemons on my counter that I was using for my lemonade diet, I decided that a Scaloppine sauce would not only work out great, but I also had some Gardein Chick'n that I could cook up in the sauce also.   And then I thought about the one beautiful bottle of white wine that I had, not an inexpensive one but a sweet and beautiful Pinot Grigio I had bought in my travels to wine country and I did not want to cook it away.  That wine needed to be savored with my meal, but not in it.  So low and behold... I used a beer that my son had in the refrigerator. I sure hoped he wouldn't miss it but there was no turning back now. Well, the beer not only made the most savory of sauces but added less sugar in the sauce, and this is better since I was having my sugar in my drink. Yeah, and I won't cave and settle on no wine with pasta...it's just not the Italian way! Oh my goodness was this sauce the bomb, and so really really delicious that my son's fiance had no idea that this was a vegan meal. Go figure!

Scaloppine Beer Sauce Recipe:
*Note- I floured and pan fried the Gardein chick'n in 2 Tbs olive oil in a pan.  Then I added the beer to de-glaze the pan.   If you do this step and include floured chick'n, do not add in the flour since it will make your sauce too thick.

4 Tbs Vegan margarine
1 tsp fresh minced garlic
2 Tbs capers
2 Tbs lemon juice
8 Oz Beer
2 Tbs Almond Milk (unsweetened)
2 Tbs flour
1 Tbs chopped Italian parsley
.
In a shallow pan, melt margarine and add flour and stir.  Add beer, lemon juice, capers and garlic and stir. Whisk in almond milk and let it start to reduce down until it begins to thicken enough to a sauce consistency. Use sauce on Chick'n or pasta and sprinkle with chopped parsley.  Mangia and Enjoy.

To my delight, I had a little sauce, a piece of Chick'n and some pasta that I packed away for tomorrow's one meal.  Oh boy, left overs at its best!


Hey Lovely...

Thank you for stopping by to see me.  I'd love it if we could meet up again. Let me know what you think about this recipe and my others by joining me here on the blog, facebook or instagram and share a little love.  Why?  Well, it's because I love you too...

So stay awhile, have a nice beverage of your choice, grab a treat or two and enjoy....

                                                   ©2015 MyDeliciousVeganDiary


Monday, April 25, 2016

Strawberry Lemonade Cheezcake Mousse


I know...
Another dessert post.  
Why?
Because all work and no play makes Kimberly a dull girl! Where have we heard that before?  Well those that know will take this serious.  It seems like the busier I get, the more desserts I bake.  I would have to say that it is NOT because I'm addicted to sugar (which may be true) but that lately I've been a baking queen because it's my release when I'm stressed.  Creation of recipes helps me to escape the hustle and bustle of the busy life and focus my attention somewhere else.  And then, when I've baked or made my new creations, I have to have company over to try it.  Thus, my second escape from the craziness life throws at me is to have a nice conversation with friends...and dessert to compliment that sweetness of friendship.  
Hey, wake up! I hope I didn't bore you with my revelation of self but let's move on to the good stuff, Strawberry Lemonade Cheezcake Mousse. A Silky and creamy smooth bowl of deliciousness that perks up the taste buds just in time to absorb the slightly sweet flavors of spring and summer and the crunch of a cookie.  It's not too sweet but perfectly balanced for a snack, breakfast or dessert. You may just want to remember this recipe for a nice little party you throw for Mom since Her day, Mother's day, is coming up ya know. Or just make it for yourself, because YOU are Special too. 


Strawberry Lemonade Cheezcake Mousse Recipe:

Crust-
3/4 C Crushed Cookies.  (I used gluten free because they also hold up well to keep the crunch.)
1 Tbs Melted vegan margarine
Mix in a bowl and then pat down into a small souffle cup.


Filling-
8 Oz Vegan Cream Cheez  (I used Tofutti brand)
1 Tbs warmed coconut butter
1/4 C Sugar
1/2 Tsp Vanilla
Zest of Lemon and 1 1/2 Tsp lemon juice
4 Large Strawberries
In a Blender or food processor,  process on high for 2 min or longer until smooth and fluffy.  Spoon over cookie crumbs and let set over night, uncovered.  Enjoy...


Hey Lovely...

Thank you for stopping by to see me.  I'd love it if we could meet up again. Let me know what you think about this recipe and my others by joining me here on the blog, facebook or instagram and share a little love.  Why?  Well, it's because I love you too...

So stay awhile, have a nice beverage of your choice, grab a treat or two and enjoy....

                                                   ©2015 MyDeliciousVeganDiary

Monday, January 11, 2016

Biscuits And Avocado Sage Gravy


It's breakfast time.  I wake up, walk into the living room/ kitchen to perk myself a cup of coffee.  I sip it as I turn and notice hubby staring at me from the couch.  His google-y eyes are staring into my mind and giving me that "I am starving" look.  "Are you hungry?" I asked. "Yes" said the google-y eye staring man.  That was the start of today. It seems like all we have eaten for the last few weeks since my Pignolata recipe has been Chipotle style sofritas for breakfast.  Day in and day out we have enjoyed this mixture in a burrito wrap but today I simply wanted to make something new.  Something to satisfy the hungriest of hungry men and of course, me.  So going through my pantry, I found a few things to throw this simple tasty meal together.  This Avocado Sage Gravy is going to be something you crave.... with its delicious savory flavors of Sage and Thyme, you may want this every day for a couple of weeks...
if you're anything like me!  Enjoy, share...love!  
 
 
Avocado Sage Gravy Recipe:
 
1 C. TVP or Sausage Flavor TVP (Textured Vegetable Protein)
2 C. Vegetable stock
1/2 Soft Avocado
2 C. Rice Milk
1 Tbs. Vegan Butter
2 Tsp. Sage
1/2 Tsp. Red Pepper Flakes (I like mine hot so I add 1 whole teaspoon.)
1 pinch of Thyme
1 Tsp. Nutritional Yeast
1 Tsp. Liquid Aminos
Salt and Pepper to taste
Thickener:
2 Tbs. Flour plus 4 Tbs. water
Baked Biscuits
 
On high heat, pour TVP into a fry pan, add vegetable stock and stir until it's absorbed.


Add Avocado, Thyme, Sage and mix into TVP mixture until most of the avocado is smooth. Small bits of avocado may remain and that is fine but too big of chunks will make your gravy taste too much like avocado dip.


 Add Rice milk, stir and heat on high heat until mixture starts to bubble.  Add Vegan butter, nutritional yeast and Liquid Aminos, stir, add thickening mixture and stir until it starts to thicken.
 
Add red pepper flakes and salt and pepper to taste.  No salt added will give this dish a very flat and flavorless taste.  I recommend at least 1 Tsp.  Remove from heat and serve up this tasty and delightful savory sauce over fresh hot biscuits.  I used canned biscuits to make this recipe go from quick to speedy. 


Hey Lovely...

Thank you for stopping by to see me.  I'd love it if we could meet up again. Let me know what you think about this recipe and my others by joining me here on the blog, facebook or instagram and share a little love.  Why?  Well, it's because I love you too...

So stay awhile, have a nice beverage of your choice, grab a treat or two and enjoy....

                                                   ©2015 MyDeliciousVeganDiary